Wednesday 30 August 2017

Painted Harvest Bundle

Welcome back everyone 😊

Today I am sharing with you all a sneak peek of a new product!
 This product will be available from the 1st of September 2017
You can find it in the new 2017 Holiday Catalogue


If you haven't got your copy yet then please contact me so I may get one to you ASAP!

OK
The products I am sharing are the new PAINTED HARVEST Bundle
This can be found on page 48 of the new catalogue.

The inspiration for this card came from a colour challenge #CI16 
Image may contain: bedroom and indoor

This colour challenge came from a FaceBook Group called Colour Inkspiration 
To join this group and the challenges that are held fortnightly just click the name and ask to join.


Here is my card

Give Thanks

Front view

#KOCreationscards #Paintedharvest #Sunflowers #Thanksgiving #Christmas #Givinggifts #Cardmaking #Stampinup

I simply adore the way these colours look together, they lend themselv es so nicely to this eclectic card that I have put together.
A perfect card to give as an invitation to thanks giving dinner.

Card stock and Accessories

  • Painted Harvest Bundle (146021) available from the 1st September
  • Graceful Garden stamp set (143849)
  • A4 Thick Whisper White card stock (140490)  plus a scrap piece for the flower image. 
  • A4 Basic Grey card stock (2121689)
  • Dapper Denim ink pad (141394)
  • Sahara Sand ink pad (126976)
  • Basic Grey (140932)
  • Linen Thread (104199)

Angled View

#KOCreationscards #Paintedharvest #Sunflowers #Thanksgiving #Christmas #Givinggifts #Cardmaking #Stampinup


Basic Directions

  • Fold the A4 whisper white card stock in half. then cut at 10.5 cm.  Cut the the other half into two for the front and inside layers.
  • Trim the Basic Grey so that it leaves a 2mm edge around the card. 
  • Trim the whisper white layer so that you can see 2 mm of Basic Grey around the edge.
  • Using the scrap piece stamp the flower using the two step sunflower stamps in Dapper Denim.
  • Add the inside of the flower using Sahara Sand and the centre image.
  • Fussy cut and put aside.
  • Stamp the lattice background with Basic Grey using the stamping off technique.
  • Using the Sahara Sand stamp pad lightly dab it over the lattice image.
  • Put all layers together for your card base.
  • Punch two sets of leaves from the basic grey card stock.
  • Layer the Linen Thread and fussy cut flowers using dimensionals.
  • Add the leaves where desired.
  • Stamp the sentiment onto whisper white and trim to a banner style. Using your bone folder gently bed into shape.
  • For the inside stamp the sunflower image the same as the front but add two leaf images in basic grey using the lined leaf image and the stamping off technique.

Open View

#KOCreationscards #Paintedharvest #Sunflowers #Thanksgiving #Christmas #Givinggifts #Cardmaking #Stampinup


If you are searching for any of these items to purchase then please use the carousel below. It has most items listed and is linked directly to my store.
The only item not listed is the Painted Harvest bundle. This will be available to order from the 1st of September.


Thank you so very much for visiting my blog today.
If you ahvea any questions please ask in comment section below. 
I always reply.


Enjoy The Little Things In Life Design Team - Vacation Memories


Image may contain: text

Welcome back crafty people 😊 I am so happy you could join me today.
The Video Blog Hop Design Team are a groups of demonstrators from all over the world. We on the last Wednesday of each month.
We have some wonderful projects and tutorials to share with you today, we hope to inspire you with new ideas and hopefully give you somehelpful along the way.
Today's theme is - Vacation Memories.

 As I have just recently returned from New Zealand paper crafting retreat  now is a perfect time to share something I created over there thanks to a class 😊 Plus you get to see some more of my pictures.

Our guest tutor while on the retreat was Susan Wong and she taught us how to make this gorgeous Straw Mini Album.
And I straight away, asked if it was OK to share this fabulous idea with you all 😇

Naturally Eclectic Mini Album


#Minialbum #Holidaymemories #KOCreationcards #Naturallyeclectic #Memorykeeping #Bragbook


View of Naturally Eclectic Album from differing angles.

#Minialbum #Holidaymemories #KOCreationcards #Naturallyeclectic #Memorykeeping #Bragbook


Here is a link for the written tutorial for this album that I have written up and added to my Google Docs to share..
You must have google drive to view this document.
MINI ALBUM TUTORIAL

As I have had 2 sick children for the past week and a half my time hasn't been condusive for creating a video.
Susan provided me with the original video from Renate Ecklmayr that she used to learn how to create these cute albums.
I will give you this link to Renate's blog HERE (the blog is written in german but you can use the translate button)
The video is also in German


This video along with my written tutorial will give you an idea of how the album goes together.

I almost have a video created though, and I will upload it to my You Tube Chanel as soon as it is ready.

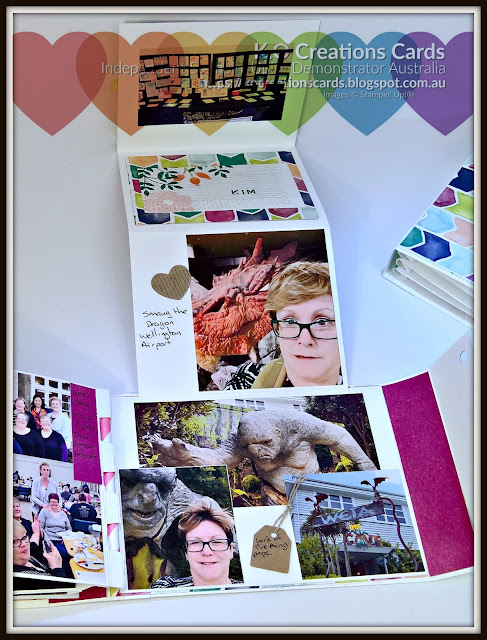
I will now add a couple of more pictures of my already filled album for your viewing pleasure.

MINI ENVELOPE

Folded out to show card insert.

#Minialbum #Holidaymemories #KOCreationcards #Naturallyeclectic #Memorykeeping #Bragbook


TAG INSERT

Partly pulled out.

#Minialbum #Holidaymemories #KOCreationcards #Naturallyeclectic #Memorykeeping #Bragbook

ACCORDION FOLD 

Unfolded out and down

#Minialbum #Holidaymemories #KOCreationcards #Naturallyeclectic #Memorykeeping #Bragbook

ACCORDION FOLD

Unfolded out and up.


#Minialbum #Holidaymemories #KOCreationcards #Naturallyeclectic #Memorykeeping #Bragbook


These would make perfect gifts for those about to travel, new parents and grand parents too. What a wonderful way to share their new family members or some of those treasured holiday photo's.
Make one for a 21st or an 18th and fill ot with memories leaving a few spots for new memories 😉

You are currently here with me Kim Oliver of Australia.
You will find a list for the names of the other DT members below, just click the name after mine to continue through the blog.


If you are looking to purchase any of the items I used to create this gorgeous mini album with then please use the carousel below.


Thank you so very much for visiting my blog today.
I do hope that you have enjoyed my efforts.

If you ahev any questions please ask then in comments below.
I always reply.

Saturday 26 August 2017

Crazy Crafters Blog Hop - Holiday Catalogue Sneak Peek - Christmas Snowflakes Gift Pack


Welcome back everyone 😊

Wowsers I have had some fun fitting everything in since I returned home from New Zealand.
When I actualy returned home I found 1 little girl who was rather ill with the flu and my little man failing fast.
That was Monday afternoon! It is now Saturday and things haven't changed all that much, but being a mum we are just expected to keep on keeping on 😎
To that end I am quite thankful that while I was away I created some projects using some new Holiday Catalogue products!
I am sharing some of these creations with you today along with some other talented ladies from the Crazy Crafters group for this Holiday Catalogue Sneak Peek blog hop.

There are truly some gorgeous products avaailable in this season catalogue!

For my projects I chose to use the Merry Little Christmas 12 x 12 Old Olive and Kraft cardstock pack on page 10 of the Holiday Catalogue.
I paired this with the Winter Wonder Snowflakes that are available on page 37 and the Winter Wonder Textured Impressions embossing folder found on the same page.

Here is my project.

 CHRISTMAS SNOWFLAKES

Gift Set


The sentiment is part of one stamp from the Carols Of Christmas (146037) stamp set. This can purchased RIGHT NOW from the catalogue on it's own or paired with the matching thinlits in a bundle! How amazing is that!
You can order all other items from the Holiday Catalogue from the 1st of September.

If you are looking for directions to create the little pizza boxes then please click HERE
The link will take you to Susan Wong's blog. She is the lovely lady who taught me how to create them while I was in New Zealand.

Open View


My box was embossed using the Winter Wonder Textured Impressions embossing folder before putting it together while I debossed using the same folder for the card front. Debossing helped me to maintain cleaner lines and keep the card front interesting.
Using vellum, I die cut some smaller snowflakes from the Trim Your Stocking Thinlits dies which can be found on page 15 of the 2017 Holiday Catalogue. I used these to accentuate the Foil Snowflakes on the box and card...I know what you are thinking...'But they aren't foil!' 
Well I reversed them 😉 Don't they look amazing! 
When I turned the foil snowflakes over I realised I LOVED the wood cut look and even the texture of these, just as much as the intended foil fronts!


As I wanted this to be a complete gift set, I created a tile necklace using a small square of the Merry Little Christmas DSP found on page10 of the catalogue.
The holder and display for the necklace I created using the Old Olive cardstock.

I do hope you have enjoyed your visit with me and the sneak peek of some items available from the catalogue.

To see more projects and items from the catalogue please click the name after mine.


Thank you so very much for stopping by my blog today. 
If you have any questions please ask them in the comment section below. 
I always reply 😊

Friday 25 August 2017

Ink It Stamp It DT Blog Hop - 3D project

No automatic alt text available.

Welcome to the Ink it! Stamp it! Blog Hop. This month we will be sharing projects inspired by our 3D theme. The full line up near the end of this post will guide through all the projects. 
We'd love to hear from you on what your favourite 3D project is that you have made and used to create it with? 

I have recently been to a paper crafting retreat held in New Zealand. 
CLICK HERE to see details of my trip.
Of course I took with me a few items to create with during free time. As a demonstrator I pre-ordered from the catalogue to show my customers these fab new products (a benefit of being a demo 😊) But as I had to pack lightly I couldn't take everything. 
I found while there I wanted to make a gift tag set using the mini Pizza boxes becoming available lol. 
BUT of course I had left them at home.
Susan Wong who was the guest tutor at the event mentioned that she had created simple pizza style boxes around 12 mths ago and was happy to share her instructions with me.


So using the' Merry Little Christmas' suite (Pg 10 2017 Holiday Catalogue) I began to create.

Here is the box

For You 

Gift tag box


#KOCreationscards #Merrylittlechristmassuite #Stampinup #Christmastags #Christmasgifts #DIY #Gifts #Gifttags #DIYChristmasgifts


I used the Old Olive card stock for the box itself and cut to directions
CLICK HERE FOR DIRECTIONS

To texture the lid I used the Winter Wonder Textured Embossing Folder (pg 37)
Once cut and trimmed I put it all together using Fast Fuse.
The belly band holding the lid closed was created using the Merry Little Christmas DSP.

#KOCreationscards #Merrylittlechristmassuite #Stampinup #Christmastags #Christmasgifts #DIY #Gifts #Gifttags #DIYChristmasgifts


The tags themselves were created using the Merry Little Christmas matching 12 x 12 card stock. The bases were cut to 3 x 3' squares to fit snugly inside the matching box.
Each tag front and lid decoration was created using a mix of  'Merry Little Labels' bundle and the 'Carols Of Christmas' bundle and Basic Black archival ink.
These are a super idea to give instead of Christmas cards or even as thank you gifts for people, then they can use them for their gift giving purposes.!


#KOCreationscards #Merrylittlechristmassuite #Stampinup #Christmastags #Christmasgifts #DIY #Gifts #Gifttags #DIYChristmasgifts

I am elated with how they finished and can't wait to give them to people as gifts ready for their Christmas giving.


#KOCreationscards #Merrylittlechristmassuite #Stampinup #Christmastags #Christmasgifts #DIY #Gifts #Gifttags #DIYChristmasgifts

List of items used.

SETS AND CARDSTOCK
  1. Merry Little Christmas DSP (144621)
  2. Merry Little Christmas 12 x 12 cardstock (144622)
  3. Basic Black Archival Ink (140932)
  4. Merry Little Labels Bundle (146030)
  5. Carols Of Christmas Bundle (146037)
  6. Trim Your Stocking Thinlit Dies 144682)
EMBELLISHMENTS

  • Rhinestone Basic Jewels (144220)
  • Mini Sequin Trim SILVER (144230)
  • Basic Black Bakers Twine (134567)
ADHESIVES
  • Multipurpose Liquid Glue (110755)
  • Fast Fuse (129026)
  • Mini Stampin' Dimensionals (144108)


Thank you so much for joining us today. We hope you'll join us again next month to see our Holiday Catalogue projects. 
I'm Kim Oliver and to keep hopping around see the list below to see who is up next.


Most of the items used will be available from the 1st of September
BUT due to Stampin' Up doing an EARLY RELEASE for some items you can get your hands on some of the items now. 
If you would like to purchase any of those items that are available please look no further than the carousel below. It is linked directly to my store.
When ordering on line with me please remember to use the
Hostess Code for August
VSF96XYM
All those who use the code and enter their contact details go into the draw for the 2 Awesome monthly prizes that are available. 1 prize is for orders under $100 and the other prize is for orders $100 and over.


Thank you for visting with me today and I do hope you have enjoyed your visit 😊
If you have any questions please ask in comments below, I always reply.

Wednesday 23 August 2017

My trip to New Zealand and The Great Welly Paper Caper!

THE GREAT WELLY PAPER CAPER 😍

A few months ago a friend of mine posted an advert for a retreat her and a mate were holding.
As soon as I saw the advert I was going!
certainly know how to hold an event!.

I will share some pics of the event with you plus some 'Holiday' snaps too 😊

I arrived Thursday afternoon to the Wellington Airport, so VERY excited. 
The fabulously gorgeous and talented Paula Dobson was waiting for me at the airport. 
After a quick hug and SOME hello's we then drove into Wellington and around Oriental Bay to the Copthorne hotel. 

#greatwellypapercaper #magpiecreates #stampinantics #stampingsusan #KOCreationscards

 I was in awe of the size of Wellington! And how the houses were tucked into the hills.
That's something that has to be seen to be believed!
There were even stairs leading up from roads below to houses above along the highway! 
I didn't get a picture of that, sorry. But WOW there must be some fit peeps living in those homes!!

#greatwellypapercaper #magpiecreates #stampinantics #stampingsusan #KOCreationscards


WOW .... What stunning views from the Copthorne! The pic on the bottom left has a yellow building with a green torch shape on the front is the Te Papa Museum. I hope to visit there next time around!

I did get to see a little of the area on foot when we went out for dinner on Courtney Place. We found a lovely Chinese restaurant called the Majestic Cuisine...My Goodness the food was delicious!


The next morning we again walked to Courtney Place to another little eatery for breakfast.
We chose Sweet Mothers Kitchen to enjoy the morning in.
#greatwellypapercaper #magpiecreates #stampinantics #stampingsusan #KOCreationscards
What a fantastic choice this was! Gorgeous laid back atmosphere with some cool bluesy tunes playing in the background. Food was great and the coffee was even better!
Then we were off to pick up the Guest tutor for the weekend the ever so talented Susan Wong from  Auckland. Susan is a past Artisan member and I really enjoy her CAS style and creativity.

#greatwellypapercaper #magpiecreates #stampinantics #stampingsusan #KOCreationscards
Paula had her Chauffers cap and Chalk Board ready lol, so Susan could find us. There was quite a humorous reaction. You can't see in the pics but another group were also holding a sign that said Welcome To Wellington. It all worked quite well together actually lol.

Then we were off to the Silver Stream Retreat.
Sharlene had already started setting up by the time we arrived, but we all hopped in setting up tables and display boards and got everything organised in a jiffy ready for the rest of the ladies arrivals.
#greatwellypapercaper #magpiecreates #stampinantics #stampingsusan #KOCreationscards

The room all set up. 
Top pic is of the 'TREATS' table, Sharlene does such a gorgeous job of creating this area, from the buntings to the flower arrangement and food. 
Middle pic is of all the tables set up and ready to go and the bottom pic is where Sharlene & Paula bring along samples for everyone to admire and be inspired by.

There were three classes held over the two days of the event with lots of free time in between to create our own designs plus perfect what we had learnt during classes. 
Each project from these classes were just gorgeous. the classes were a mix of projects, cards and 3D items. I have been wanting to create more 3D items for a while and me being me just procrastinated about it hahaha. So needless to say, I was over the moon!

First up Saturday morning was Susan Wong with a sweet and pretty Mini Album. (I will share the album I created in another blog all set out with pics from my trip)
#greatwellypapercaper #magpiecreates #stampinantics #stampingsusan #KOCreationscards

Then later in the afternoon we had Paula teaching how to create her stunning card design with a matching note pad cover.
And on the last day, Sunday morning, we had Sharlene (MagpieCreative) with a beautifully striking card and box design.
Each project used the Lots of Lovely Stamp set along with some of the DSP from the suite too.
Loads of techniques were included, such as fussy cutting, embossing, following instructions lol and building 3D items, layering plus a cool trick of how to stick Dazzling Diamonds to a card front using Adhesive sheets.

Then it was finally home time for all of us.
We packed our belongings and headed off to our homes and for myself and Susan, towards the airport.

Paula took Susan and myself to the airport, along the way we took a diversion to the Peter Jackson Digital studios in Wellington and the WETA Cave where all of the props are displayed that were used for the Lord Of The Rings movies.
I quickly snapped a few pics outside the building as we didn't have alot of time.

#greatwellypapercaper #magpiecreates #stampinantics #stampingsusan #KOCreationscards


I spent an hour or so with Susan Wong at the airport before we went our separate ways where I found even more bits and pieces from the LOTR movies.
SMAUG!

#greatwellypapercaper #magpiecreates #stampinantics #stampingsusan #KOCreationscards


I had a fabulous little holiday mixed with a crafting retreat and met some gorgeous ladies along the way. 
I made new friendships and a learnt little bit about New Zealand and the lovely and talented people living there.

#greatwellypapercaper #magpiecreates #stampinantics #stampingsusan #KOCreationscards

 I can't wait for the Great Welly Paper Caper 2018!
Like what you see? Do you want to go next year? Then you must contact Paula Dobson or Sharlene Meyers to find out all details! 
I had a blast 😊

Sunday 13 August 2017

Stamping Sunday Blog Hop - Tabs For Everything


Welcome to  the Stampin Sunday blog hop, Every month on the first Sunday we all get together and showcase an item from the current catalogues. It could be a stamp set, a bundle or a whole suite!
 
#KOCreationscards #Tabsforeverything #Gracefulgarden #Sheetmusic #Vintage #Roses #Garden #Cardmaking #Stampinup
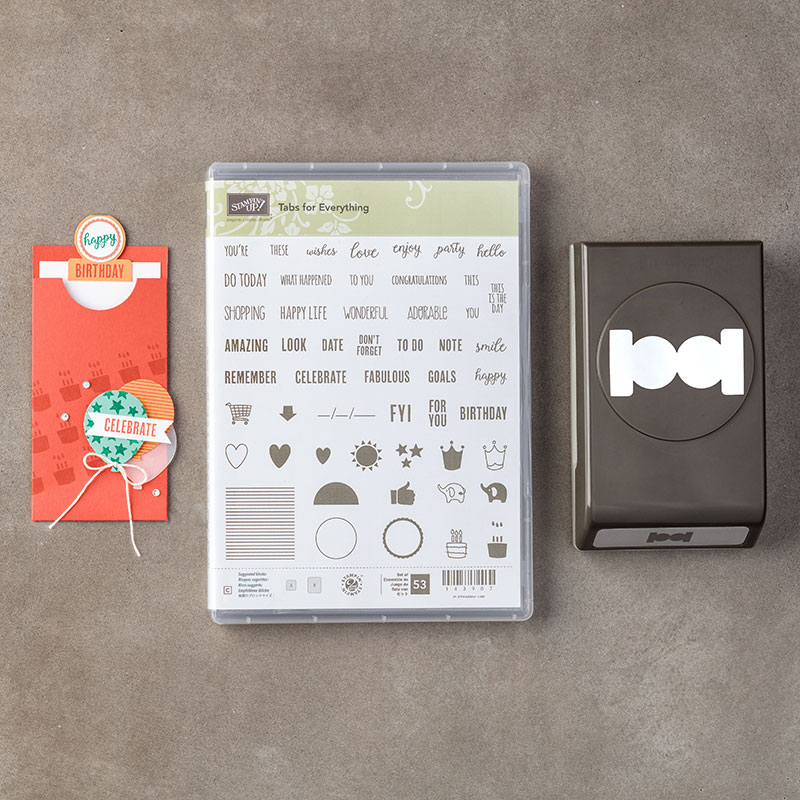
Today we are using the versatile Tabs For Everything stamp and punch set. This set is currently available in a bundle. I love bundles, they are awesome because you get to save 10% percent on the total purchase price when you purchase these items as a bundle.

You can purchase your bundle HERE

Tabs For Everything bundle.

I combined this fabulous and versatile bundle with the Sheet Music background stamp and the Graceful Garden stamp set to create a little gift set with.
 I created a card and matching Pillow box

I have also added this set to Kylie Burtuccis International Highlights with the theme Teachers Gifts. Votng for this goes LIVE from the 16th August at 8am.
You can vote for my project my by clicking on the button below, My Project is number 11. Just click the little heart in the top right corner to vote.
 Vote for Me

Love Tabs Gift Set

#KOCreationscards #Tabsforeverything #Gracefulgarden #Sheetmusic #Vintage #Roses #Garden #Cardmaking #Stampinup


My card base is thick Whisper White card stock with a layer of Chocolate Chip card stock.
I stamped my Sheet Music onto normal whisper white using the stamping off technique.
This gave me a faded and patchy look which lent itself more to the vintage feel I was after.

Using the stamp-a-ma-jig so I could stamp 2 colours on the same stamp I stamped my rose in Rich Razzleberry first cleaning off any excess colour from the leaf area before stamping. I then cleaned my stamp and inked it in Lemon Lime Twist again wiping of any excess only this time from the petals.
Once completely stamped I water coloured the whole flower, stem and leaves. Blending Rich Razzleberry, Lemon Lime Twist Pumpkin Pie and Daffodil Delight. I added clear Wink of Stella around the highlights of the rose plus 3 clear Perfect Accents..I made them clear by removing the white backing!
When all of the colour was dry I stamped the rose outline again in Rich Razzleberry to redefine the image and then fussy cut it out.

Pillow Box

Basic Directions.


You can down load a free template for 3 different size pillow boxes HERE
I decorated my pillow box to match my card. I used the same elements from the card just on a smaller scale.

Open and Angled View of Card Only

#KOCreationscards #Tabsforeverything #Gracefulgarden #Sheetmusic #Vintage #Roses #Garden #Cardmaking #Stampinup
I have also added this gift set to the Global Design Project challenge this week #GDP099 with the theme of Wedding/Anniversary, this gift set fitted their theme to perfection!

The layers beneath the rose are wide black dotted white Washi Tape, Linen Thread, Black Mini Sequins and a doily cut in half. I placed the rose on top mounted on Mini Dimensionals.
I used the Tabs For Everything as a means to attach my sentiment and placed it beside the rose with multipurpose glue.
 For the inside of my card I simply stamped the smaller rose and quickly gave it a colour wash to match the front.


Please click on the next name after mine to continue through the hop.


If you would like to purchase any of the items I used to create these projects with then please look no further than the carousel below. It has all items listed and is linked directly to my store.
When ordering on line with me please remember to use the
Hostess Code for August
VSF96XYM
All those who use the code and enter their contact details go into the draw for the 2 monthly prizes that are available. 1 prize is for orders up to $100 and the other prize is for orders $100 and over


Wednesday 9 August 2017

International Top 10 Winners Blog Hop - Gratitude Inspired by Thailand

Image may contain: text

Welcome back everyone 😊
You are here visiting Kim Oliver of Australia and this is the International top 10 Winners Blog Hop.

Every month Kylie Berucci holds an International Blog Highlights event. This is for people from all over the world to create and enter there projects for all the world to see, then people vote.
 Last month the theme was, Gratitude - Inspired by Thailand.
My projects were voted as part of the top 10.
You can see the winning project HERE
For this Blog Hop I once again chose flowers, but this time I thought I would water colour my own design.


This is the photo I chose to work from.

Parrot Flower - Impatiens Psittacina. 
This flower grows in Thailand, it gets it's name from the fact that it looks alot like a parrot.

Here is my project.

Parrot Flower

#KOCreationscards #Orangeblossoms #Gratitude #Parrotflower #Thailand #Watercolour #Watercolor

A little about me adn how this came about.
As a child I would spend hours sketching, drawing or painting. I loved art and creating in almost every form. That was right up until the time I had a brain aneurysm. After months of recovery I found I had lost all inclination to draw, paint or even create....It was like a light was switched off, I felt like this for many many years.
I started scrap booking as a way to bring back some light and have that creative outlet. Scrap booking naturally evolved into card making. Then that evolved into being a demonstrator for Stamin' Up!
I have been water colouring Stampin' Up! stamped images for a little while now as my need to create developed once again..
Then this morning, I felt a really overpowering urge..... I hadn't felt this for 18 years!
I actually WANTED to sketch and paint from scratch!!
AND
I am elated with how this turned out!
This being my first real effort in 18 years!

Close Up View

#KOCreationscards #Orangeblossoms #Gratitude #Parrotflower #Thailand #Watercolour #Watercolor


After roughly sketching out the general shape, I started applying layers of ink using our Aqua Painters.
I did this using the technique called dry water colour. That is when you apply the water colour to a dry surface with a wet brush.
Leaving each colour to dry between layers I slowly built my Parrot Flower until I was happy. When finished I used the fine tip end of my black Stampin' Write marker to define some lines and areas.
I used the Orange Blossom stamp set as my back ground leaves and buds.
Using a wide soft brush I washed Daffodil Delight over the area to finish.
I trimmed the watercolour to size and backed onto a Basic Black card stock base.

Angled and Open View

#KOCreationscards #Orangeblossoms #Gratitude #Parrotflower #Thailand #Watercolour #Watercolor

Well I do hope you have enjoyed my project today. I know I really enjoyed creating it to share with you all.

You may have just started here with me on my blog.
To keep moving through the hop please click the name after mine.


If you would like to purchase any of the items I used to create this card project with today then look no further than the carousel below. It has all items listed and is linked directly to my store.
When ordering on line with me please remember to use the
Hostess Code for August
VSF96XYM
All those who use the code and enter their contact details go into the draw for the 2 monthly prizes that are available. 1 prize is for orders up to $100 and the other prize is for orders $100 and over


Thank you so much for visiting. 
If you have any questions please use the comment section to ask them. 
I always reply! 

Sunday 6 August 2017

Vintage Leaves -Tabs For Everything - GDP098


Welcome back everyone 😊

#KOCreationscards #Vintageleaves #Smooshing #Cardmaking #Gold #Autumn #Tabsforeverything #Embossing #Enamelshapes #Coffeebreak #Stampinup #GDP098

I am sharing with you all today a new set I have recently purchased called Vintage Leaves.
I fell in love with this set as soon as I saw it in the Annual Catalogue.
The Autumn season has finished here in Australia and we are now in mid Winter.
But Autumn for me means brisk chilly days filled with a riot of colour.
My daughter and I love collecting leaves of all different colours over Autumn during our walks. She glues them to absolutey everything! lol. Me I just keep a couple and put them between the pages of a few heavy books where I keep other special flowers I have been given or found over my lifetime.

I used the Global Design Projects weekly challenge for my inspiration point and started creating.


Here is my card

Celebrate Love

#KOCreationscards #Vintageleaves #Smooshing #Cardmaking #Gold #Autumn #Tabsforeverything #Embossing #Enamelshapes #Coffeebreak #Stampinup #GDP098

My card base is Crumb Cake card stock with a layer of wood grain DSP from the Coffee Break suite.
To create my leaves began by smooshing an A4 sheet of thick Whisper white with Cajun Craze, Daffodil Delight, Chocolate Chip and Pumpkin Pie. 
I let it dry and then stamped my leaf images over the top.

#KOCreationscards #Vintageleaves #Smooshing #Cardmaking #Gold #Autumn #Tabsforeverything #Embossing #Enamelshapes #Coffeebreak #Stampinup #GDP098
When the leaves had all been cut I chose three of roughly the same shade and gold embossed over the  already stamped images. As I wanted gold highlights for my card.
I used metallic Gold Thread and wrapped that around the stems of the leaves. I wrapped this also around the DSP twice and coiled it under the leaves. 
The leaves are held in place with glue dots.
For my sentiment I chose to use the Tabs for Everything stamp and punch set. 

#KOCreationscards #Vintageleaves #Smooshing #Cardmaking #Gold #Autumn #Tabsforeverything #Embossing #Enamelshapes #Coffeebreak #Stampinup #GDP098

To finish this card off and carry through the gold just that little bit more I added 5 metallic enamel shapes.
For the inside I added a small die cut leaf with gold thread looped behind and 1 metallic gold shape.


If you would like to purchase any of the items I used to create this card project with today then look no further than the carousel below. It has all items listed and is linked directly to my store.
When ordering on line with me please remember to use the
Hostess Code for August
VSF96XYM
All those who use the code and enter their contact details go into the draw for the 2 monthly prizes that are available. 1 prize is for orders up to $100 and the other prize is for orders $100 and over


For the month of August everyone...Demo's Customers absolutely EVERYONE can pre-order this fabulous set that will be available in the new Holiday Catalogue set to be released in September!
To order your Stamp set, Die set or 
EVEN BETTER 
save 10% and buy the bundle! 
Then just click HERE


Thank you so very much for stopping by my blog today. 
I hope you have enjoyed my creative efforts 😊
If you have any questions please feel free to use the comments section to ask them. 
I always reply!